
Getting piSignage player ready & registering the player


piSignage is a complete digital signage solution powered by Raspberry Pi. The following post describes in detail how to install piSignage image on Raspberry Pi and get started with piSignage by Signing up & registering players at pisignage.com. Just make sure you have gathered all the Hardware components required before you begin.
Getting piPlayer ready - Video Demo
1. Download piSignage image to your PC
Download the latest piSignage player image, from the GitHub page and unzip the file.
2. Writing Image to SD card
Write the image to a class 10 MicroSD card (minimum 8
GB) using one of the following tools.
- For Linux
Use Etcher - For MAC
Use Apple pi Baker - For Windows
Use Win32DiskImager utility in administrator mode. - Etcher can be used to write image using Mac OS, Linux and Windows and is the easiest option for most users. For more Information on image Installation refer here. Make sure while you follow the procedure given in the previous link use the Image provided by us.
refer the link for More Info on SD Cards and writing Images.
Get in touch with us at support@pisignage.com for any assistance or to order SD Card with pre-built piSignage image.
Insert the SD Card with piSignage Image into the Raspberry Pi And we have your piSignage player ready. Connect player to the screen and power the player.(Raspberry Pi has a HDMI Port). After booting, your screen will display an Id which will be your player ID (player Id is also printed on raspberry pi ). Once you Register your player at pisignage.com using the player ID, The player can be controlled remotely from pisignage.com as long as the player is connected to the internet.
piSignage player can be connected to the internet via Ethernet cable or using Wi-Fi. If you have connected the player to internet via ethernet Cable and intend this as a default method to connect to pisignage.com, then skip to Register player. To connect the player to network via Wi-Fi, Follow the instructions given below.
3. Wi-Fi Configuration in Raspberry Pi to Connect to Network
Connect the power Source to power ON the Player. Raspberry Pi does not have a separate button on the player for Power On/Off functions.
There are three ways to configure Wi-Fi Setup for the player.
Wifi Configuration in piPlayer - video demo
NOTE- Now Configuring Wi-Fi in piSignage is even more easier with piSignage player working as a Wireless Access point. If you are Configuring Wi-fi in piSignage player for the first time Follow this method. This method works with Raspberry Pi 3 and later models.
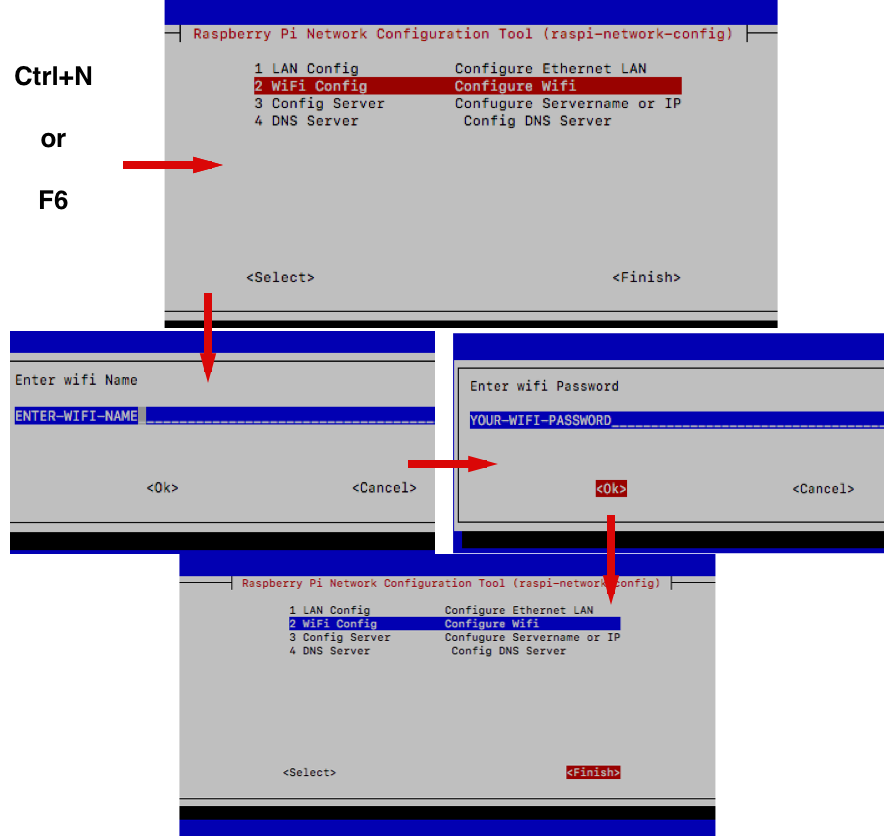
First Method:
- Connect a USB Keyboard to the player. Press Ctrl+N or F6.
- Scroll down to wifi config and enter.
- Enter wifi name and password.
- Select Finish.
Once This is done the player will Reboot. Now You can Register the player, logging into your account at pisignage.com.
Second Method:
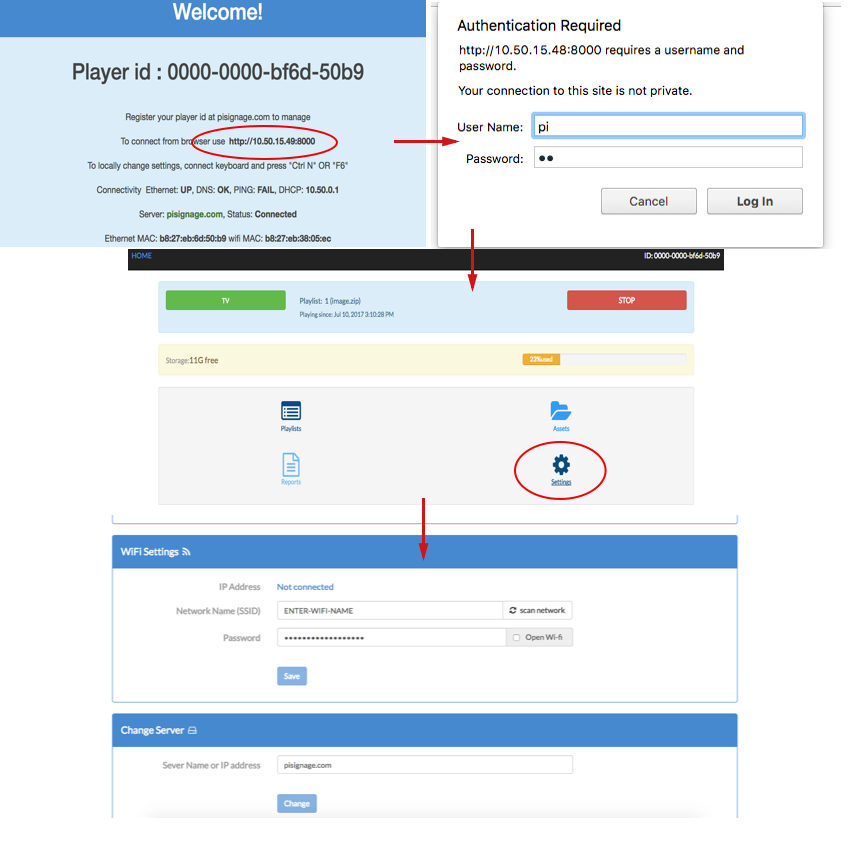
You can Configure Wifi via player interface in the browser if you can connect the player to network via ethernet.(Do not confuse this with connecting player to pisignage.com with ethernet for regular operation of player. This is just a one time ethernet connection required to Configure WiFi in the player, using Graphical player Interface via the browser).
- Go to http://your-player-ip-address:8000 from your browser, preferably Chrome.
(Your-player-ip-address will be displayed on the screen when you connect the player to network via ethernet.There are 2 ip addresses displayed.Any one can be used but convention is to use the first ip displayed.
Reboot may be required for IP to show on screen, Just remove and plug in back the power source for this). - Enter both the user name and password as pi
- Go to settings.
- Scroll Down to Wifi Setting.
- Enter the wifi details and save.(refresh tab may be required to reflect changes on screen. You can see an Wi-Fi Ip displayed on screen.)
- Leave all the entries as it is. You can now close the tab and remove ethernet and reboot, your player is ready for network connection via Wifi.
Now you can register your player at pisignage.com , with player id (displayed on screen) to manage your players from the cloud.
4. Signing Up & Registering your player at pisignage.com
You need to create an account by freely Signing up at pisignage.com. The Username is unique to you and all your player licenses are tied to this name. Select a valid email ID as all communication and licenses are mailed to this address The Signup process is seamless and we do not ask for any credit card Information. If you have signed up already just login.
With every Signup, You get 2 managed licenses ( 2 player licenses + hosting service for the 2 players at pisignage.com for lifetime) absolutely free. When you register a player, The license is automatically downloaded to the player in case of first 2 players.
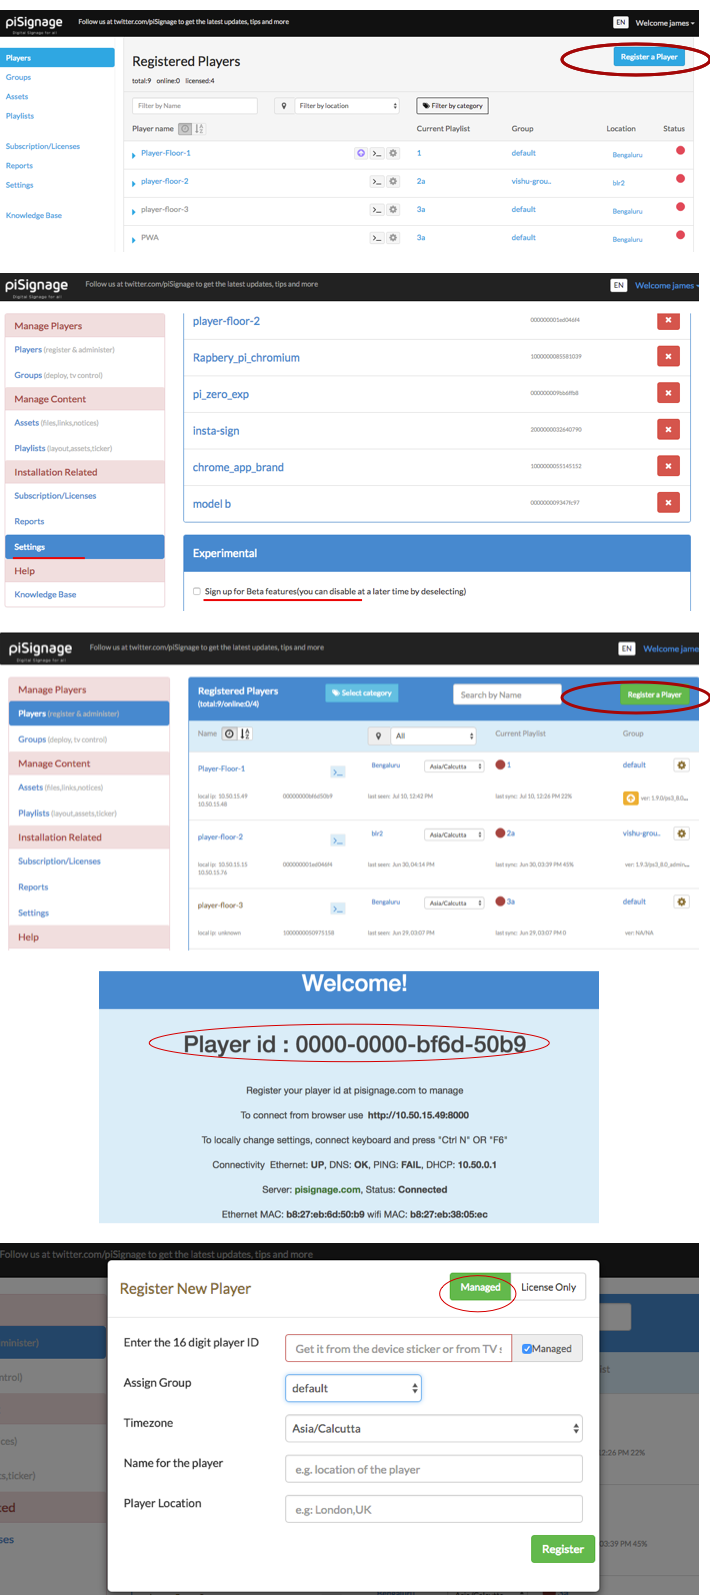
- Go to players in the left panel and select register a player.
- Enter the 16 digit player Id(on device or TV screen), leave the group to as it is. Every registered player is assigned to a group.
Groups help in Clubbing togather many players which Display same content. Refer this article to know about the utility of group feature in piSignage. Upon sign-up, "default" group is created automatically which can be assigned to newly registered players. You can create more groups if needed and assign players to these groups.
- Make sure you have selected the managed box.(License only option is for open source implementation.)
- Enter a player name and location for your operational convenience.
- Select register and a license is downloaded to the player. The players section shows all your registered players. For buying additional licenses instruction given below.
Note - We are coming up with a new UI design and features which are in beta phase. Choose UI as per your preference. Select the settings on the left panel and scroll down to choose.
Note: In case in future, if the SD card does not boot and stops after showing lot of text messages i.e if SD card is corrupt, Just write a fresh image of piSignage to the SD card again as explained above. Re-registering the player is not needed.
5.Flexible Pricing after 2 free players
We have Come up with A New, Even better pricing structure!. Read more
If you want to more players , you will have to buy managed license for 45 USD going to Subscription/license page.
We have a flexible pricing structure for piSignage.
- Every time you buy a managed license for 45 USD you get one player license and 12 credits to manage player from the cloud.
- If you go for Subscription renewal for USD 20 you get 12 credits. These 12 credits can be flexibly used to manage one player for 12 months or 2 players for 6 months or 3 players for 4 months etc.
- You can buy player licences only for USD 25 and writing to us for license activation.(Applicable only for Open Source implementation or when you want to set your digital signage locally, controlling Individual player through its graphical interface via browser).
You can also learn more about pricing here. You can also refer to the documentation for Tech details.