
How PiSignage Group Settings Simplify Large-Scale Digital Signage Management
PiSignage Groups let you manage 10–1000+ screens from one dashboard. Schedule content, troubleshoot, and update all players in a group at once — saving time for IT teams, store managers, and anyone running digital signage.


Managing digital signage across multiple locations becomes exponentially more complex as your network grows. Whether you're overseeing screens in corporate offices, retail chains, healthcare facilities, or educational institutions, keeping everything synchronized and up-to-date can quickly become overwhelming when done manually.
PiSignage Group Settings solve this challenge by turning scattered, individual screens into centralized, organized networks where updates and schedules apply automatically across all connected displays. Let's explore how this works using a restaurant chain as our primary example, then dive into the technical details that make it all possible.
1. What Are PiSignage Groups and Why They Matter 🎯
Think of groups as your command center for multiple displays. Instead of logging into each player individually to make changes, you create logical groupings—maybe "Lobby Displays," "Menu Boards," or "Conference Room Screens"—and control them all simultaneously.
The core principle is simple but powerful:
You can read the full explanation in the PiSignage Group Settings documentation.
In practical terms, if you need to update 15 menu displays with new pricing, you make one change at the group level instead of 15 individual updates. The time savings alone justify the approach, but the real value is in maintaining consistency across your entire network.
I've seen too many installations where screens drift out of sync because manual updates are inconsistent or forgotten. Groups eliminate this problem entirely.
2. Setting Up Groups for Different Scenarios 🏗️
The flexibility of PiSignage Groups really shines across industries — from retail chains and corporate offices to schools, healthcare facilities, and restaurants — by letting you organize screens by purpose, location, or audience and manage them all from one place.
Before creating groups, map your content types and update frequencies. Here are some examples to make it real for you:
Recommended Group Categories by Industry
Restaurants/QSR:
menu-displays(frequent updates)promotional-screens(weekly campaigns)waiting-area-info(static/seasonal content)
Corporate Offices:
reception-displays(company messaging)conference-room-screens(meeting info, wayfinding)employee-communication(HR updates, announcements)wayfinding-displays(building navigation)
Retail Chains:
storefront-displays(promotional content)checkout-screens(upselling, promotions)department-signage(product information)customer-service-displays(wait times, information)
Healthcare Facilities:
waiting-room-displays(health education, entertainment)wayfinding-signs(department directories)staff-communication(internal updates)emergency-displays(critical announcements)
To show you how this works in practice, let’s take a restaurant chain as our example. In these setups, I typically recommend creating separate groups for different content types like we just discussed above — one for menu displays, another for promotional screens, and a third for informational displays in waiting areas.
For corporate environments, we recommend organizing groups by function: "Reception Displays," "Conference Room Screens," "Employee Communication Boards," and "Wayfinding Displays." Each group can have completely different settings, schedules, and content while being managed from the same central dashboard.
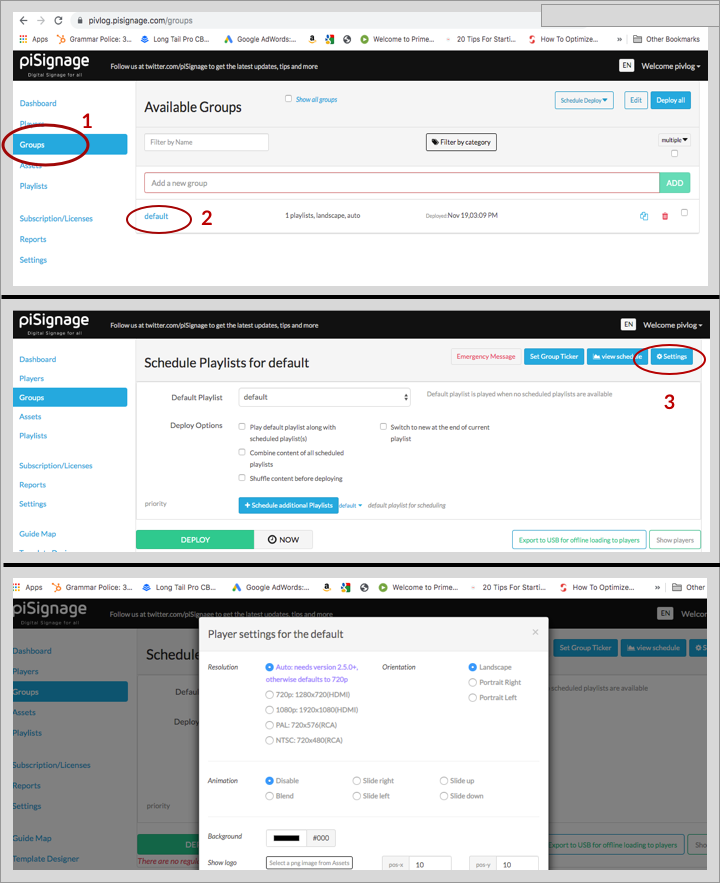
The setup process is straightforward: register your players, create your groups, and assign each player to the right group. For a detailed walkthrough, see the PiSignage Group Settings documentation.
What I particularly appreciate is how this scales. Whether you're managing 10 screens or 100, the administrative overhead remains minimal because you're working with groups, not individual devices.
3. ⚙️ Advanced Group Configuration Options
Once your groups are established, the real power comes from the granular control options available in PiSignage's group settings. Having configured hundreds of deployments, I'll walk you through each setting and when to use them effectively.
🖥️ Display Configuration Settings
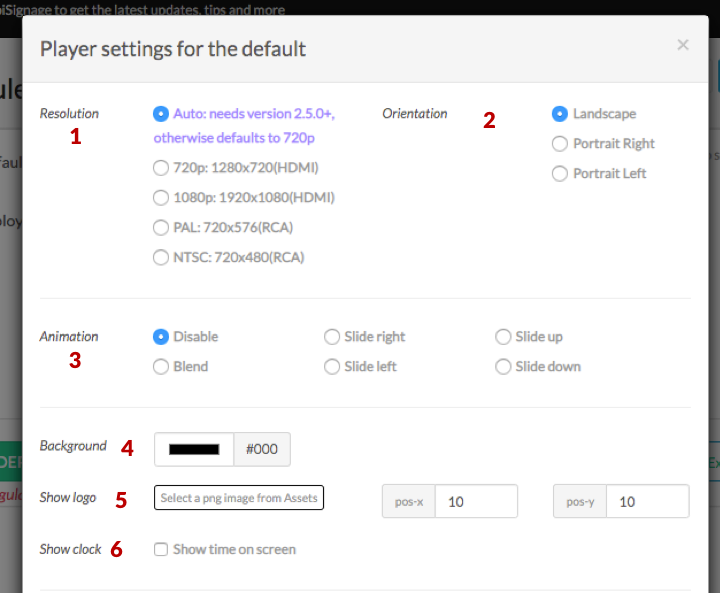
Resolution Selection
PiSignage supports multiple resolution options, and choosing the right one affects both performance and visual quality:
- Auto Mode (Version 2.5.0+): Automatically detects optimal resolution—my go-to for mixed hardware deployments
- HD (720p): Perfect for secondary displays, menu boards, and when bandwidth is limited. Most of my retail implementations use 720p
- Full HD (1080p): Essential for main displays where image quality matters, like lobby screens or detailed wayfinding
- PAL/NTSC: Legacy format support for older displays—rarely needed but available
Orientation Controls
Managing mixed portrait/landscape deployments becomes simple with proper orientation settings:
- Portrait Right: Screen rotated clockwise—standard for door-mounted displays
- Portrait Left: Screen rotated counter-clockwise—less common but useful for specific mounting constraints
- Landscape: Default horizontal orientation
We typically recommend creating separate groups for different orientations to avoid aspect ratio conflicts when deploying content.
Animation and Transitions
Content transitions can make or break the viewer experience. The available options each serve different environments:
- Slide Right/Left/Up/Down: Eye-catching for retail environments, but can be distracting in corporate settings
- Blend: Smooth transitions perfect for professional environments—my preference for office lobbies
- None: Instant transitions for information-heavy content where smooth flow matters more than visual effects
🎨 Visual Customization Features
Screen Background Color
The default black background (hex #000000) works for most applications, but customization adds brand consistency. If you use corporate brand colors for lobby displays and neutral grays for information kiosks, you can use the color wheel or enter specific hex codes to match existing brand guidelines.
Logo Positioning
Brand reinforcement through strategic logo placement has proven valuable across my deployments:
- Default position: Top-left corner
- Custom positioning: Use X/Y coordinates to place logos where they won't interfere with content
- Sizing considerations: Logos should be subtle but visible—so keep them under 10% of screen real estate
Clock Display Options
Time display serves both functional and professional purposes:
- 12-hour vs 24-hour format: Match your organization's standard (healthcare typically uses 24-hour)
- Position options: Top-right or bottom-right placement
- When to use: Essential for waiting areas, conference rooms, and public spaces
📊 Content Management and Performance Settings
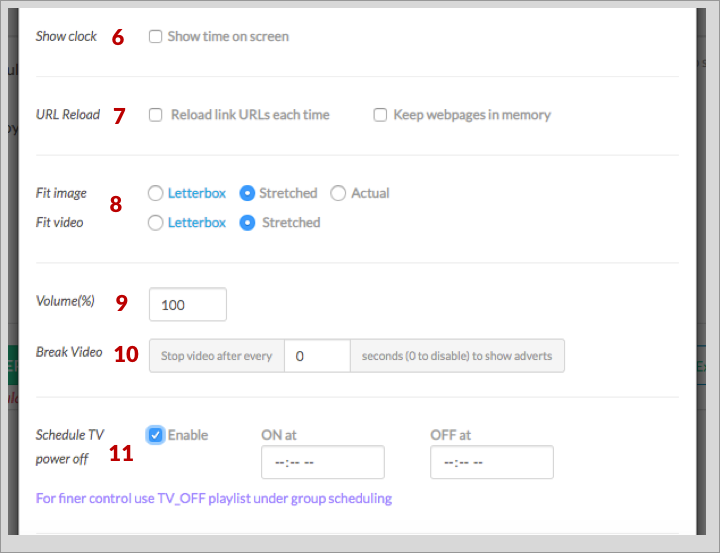
URL Reload Intervals
For web-based content, automatic refresh prevents stale information:
- Standard refresh: Every 30-60 minutes for semi-static content
- Frequent refresh: Every 5-10 minutes for live data feeds
- Network consideration: More frequent reloads increase bandwidth usage
Fit Screen Options for Media
Proper aspect ratio handling prevents the distorted content that plagues many installations:
- Actual Mode: Displays content at original dimensions—use for precisely-sized graphics
- Letterbox Mode: Maintains aspect ratio while maximizing screen usage—my standard recommendation
- Stretch Mode: Fills entire screen but may distort content—avoid unless specifically designed content
Audio Volume Control
Group-level audio management prevents the chaos of multiple competing sound sources. Set different volume levels for different content types: background music at 40%, promotional content at 60%, and emergency announcements at 80%.
🤖 Advanced Automation Features
Break Video and Advertisement Insertion
This sophisticated feature allows you to pause long-form videos to insert advertisements—particularly valuable for waiting areas and retail environments:
- Configuration: Set pause intervals (e.g., every 20 minutes)
- Advertisement Playlist Integration: Scheduled advertisements play during breaks, then resume main content
- Use Cases: Perfect for educational content, product demonstrations, or entertainment programming
- Limitation: Only works with video assets, not images or web content
Configuration Example:
Main Content: 20-minute product demonstration video
Break Interval: Every 5 minutes
Advertisement Playlist: 30-second promotional clips
Result: 20-minute video becomes 22-minute program with 4 ad insertions
Use Cases
- Waiting Areas: Educational content with health tips (healthcare)
- Retail Environments: Product demos with promotional interruptions
- Corporate Lobbies: Company history with current initiative highlights
Deploy Daily At Scheduling
The scheduling feature is particularly valuable. You can "Control all your players at various locations, centrally from your browser… schedule playlists to players under groups". This means your breakfast menu automatically switches to lunch at 11 AM across all locations without any manual intervention.
Here's the link for detailed explanation from PiSignage Features.
TV Auto On/Off Scheduling
Power management automation that reduces energy costs and extends display lifetime:
- Basic scheduling: Set daily on/off times (e.g., 9 AM to 7 PM for retail)
- Advanced scheduling: Multiple on/off cycles throughout the day
- Integration with ADVT playlists: Coordinate power schedules with content schedules
- Energy savings: Significant cost reduction for large deployments—typically 30-40% power savings
Daily Player Reboot Options
System maintenance automation that ensures consistent performance:
- Timing: Schedule reboots during off-hours (typically 3-4 AM)
- Benefits: Clears memory leaks, applies system updates, ensures fresh start daily
- Optional but recommended: While not technically necessary, daily reboots prevent accumulation of minor issues
⚡ Technical Performance Optimization
Video Player Selection
Choose between two video engines based on your performance priorities:
- OMX Player (Default): Stable, reliable performance for standard deployments
- MPV Player: Better performance with minimal gaps between video assets, but historically less stable
- Recommendation: Stick with OMX unless you specifically need seamless video transitions
Kiosk Menu Functionality
Transform any display into an interactive kiosk with touch capability:
- Use cases: Wayfinding, directory systems, interactive product catalogs
- Hardware requirements: Touch-enabled displays
- Content considerations: Design content specifically for touch interaction
🔒 Network and Security Configuration
WiFi AP Management
PiSignage players can function as wireless access points for initial configuration:
- Auto-disable: WiFi AP automatically disables after initial network configuration
- Manual control: Use "Disable Player WiFi AP" setting for wired-only deployments
- Security consideration: Disable AP functionality in security-sensitive environments
Player Web UI Access Control
Centralized control versus local access management:
- Enable local access: Allows on-site technicians to configure individual players
- Disable local access: Forces all configuration through central server—my recommendation for most deployments
- Security benefit: Prevents unauthorized local modifications that could compromise group consistency
Remember:
For a detailed explanation, check out the PiSignage Group Settings documentation.
4. Troubleshooting Common Multi-Screen Challenges🔧
After deploying hundreds of screens across different environments, We've developed a systematic approach to diagnosing and fixing the most common issues that plague multi-screen installations.
Content Synchronization Issues
The most frequent issue people encounter is content synchronization across multiple displays. When you have groups of screens that should show identical content but they're out of sync, the problem usually stems from network connectivity or deployment timing.
Scenario 1: Gradual Drift Between Screens
This happens when players lose connection during deployment or have inconsistent network latency. The solution is implementing staggered deployment schedules. The "Deploy Daily At" feature helps force fresh synchronization at off-peak hours (typically 3 AM) when network traffic is minimal.
Scenario 2: Some Screens Show Old Content
When individual players cache outdated content, it's usually a firewall or DNS issue. Check that players can reach your PiSignage server on ports 80/443. The "URL Reload" feature helps with web-based content, but won't fix cached media files.
Scenario 3: Video Assets Stop Mid-Playlist
This is often a bandwidth issue. Large video files require sustained throughput, and if your network can't deliver, playback becomes erratic. We recommend keeping video assets under 100MB for multi-screen deployments and using 720p resolution unless 1080p is absolutely necessary.
🛜 Network Requirements and Bandwidth Planning
Here's what I've learned about network infrastructure for reliable group deployments:
Minimum Requirements Per Screen:
- Initial deployment: 2-5 Mbps sustained (depending on content size)
- Ongoing operation: 0.5-1 Mbps for web content updates
- Video-heavy playlists: 1-3 Mbps sustained per screen
Critical Network Considerations:
- Ensure your DHCP pool can handle all players (I've seen deployments fail because someone forgot to expand the IP range)
- Configure Quality of Service (QoS) to prioritize signage traffic during business hours
- Use wired connections for screens playing video content whenever possible
- Set up network monitoring to catch bandwidth bottlenecks before they affect content delivery
Firewall Configuration:
Most corporate firewalls block the ports PiSignage needs. Ensure outbound access on ports 80, 443, and 22 (for remote debugging). If you're using the hosted service, whitelist *.pisignage.com domains.
🔧 Troubleshooting Flowchart for Sync and Connectivity Issues
When screens aren't behaving as expected, follow this diagnostic sequence:
Step 1: Verify Basic Connectivity
- Can you ping the player's IP address?
- Does the player show "Online" status in your dashboard?
- Check the player's local time—time sync issues cause scheduling problems
Step 2: Check Group Assignment
- Confirm the problematic player is assigned to the correct group
- Verify group settings aren't conflicting with individual player configurations
- Remember: "Group settings override player webUI settings when there is a conflict"
Step 3: Content Deployment Status
- When was the last successful deployment to this group?
- Are other players in the same group exhibiting the same behavior?
- Try manually deploying the playlist to isolate deployment issues
Step 4: Network Diagnostics
- Check available bandwidth during deployment windows
- Verify DNS resolution (players need to resolve your server address)
- Test from the player's network segment, not just your admin workstation
Step 5: Player Health Check
- Review player logs through the remote debugging interface
- Check available storage space (full storage prevents content updates)
- Verify the player software version matches your group requirements
5. Integration with Existing AV Infrastructure 🔌
Integrating PiSignage into established AV environments presents unique challenges.
VLAN and Network Segmentation Issues
Many organizations isolate AV equipment on separate VLANs. This works fine until the players need internet access for content updates. The best practice is requesting a firewall rule allowing signage VLANs to reach specific external services while maintaining internal isolation.
Display Control Integration
When PiSignage players share displays with other AV sources (switchers, matrices), timing becomes critical. Use the "Schedule TV Off" feature to ensure players don't conflict with scheduled meetings or events. For complex switching scenarios, coordination with the facility's control system programmer helps create mutually exclusive schedules.
Audio Routing Challenges
In spaces with centralized audio systems, individual screen audio can create conflicts. It's a good practice to disable audio at the group level for screens connected to house sound systems, using separate audio-enabled players only for standalone applications.
Content Management Workflow Integration
The biggest integration challenge is usually human, not technical. Existing content approval workflows may not account for the speed and flexibility of digital signage updates. I recommend establishing clear content ownership and approval processes before deployment, defining who can update which groups and under what circumstances.
Legacy Infrastructure Compatibility
Older network infrastructure may not support the bandwidth requirements for modern digital signage. When upgrading isn't possible, use content optimization strategies: smaller file sizes, lower resolution for secondary displays, and strategic scheduling to avoid peak network usage periods.
Power Management Integration
In facilities with automated power management, ensure your players receive consistent power or can handle graceful shutdowns. Unexpected power cycles can corrupt local content storage, requiring re-deployment of entire playlists.
6. FAQ ❓
Q: How do I prevent individual technicians from changing settings on specific players when I need centralized control?
A: Use the "Disable Player Web UI" option in your group settings. This prevents local access to individual players while maintaining central control through the server. Group settings will override any local configurations, ensuring consistency across your network.
Q: Can I schedule different content for the same group at different times without manual intervention?
A: Yes, use the "Deploy Daily At" feature combined with scheduled playlists. You can set up multiple playlists for different times of day, and the system will automatically switch between them. For example, breakfast menus at 7 AM, lunch at 11 AM, and dinner at 5 PM, all automated through group scheduling.
Q: Can I connect a PiSignage player to Wi-Fi for group management?
A: You can configure Wi-Fi during initial setup or later through the player’s settings. Make sure to assign it to the correct group after connection. See: How to Connect PiSignage Player to Wi-Fi: Step-by-Step Configuration Tutorial.
Q: Can I use PiSignage Groups for specialized industries like clinics or restaurants?
A: Yes. Groups are ideal for industry-specific needs like scheduling patient information in clinics or managing multiple digital menu boards in restaurants. See: Automating Your Clinic’s Digital Signage: Save Time with Smart Scheduling and Monetize Your Digital Menu Boards: 5 Ways to Boost Revenue.
7. How to Make Your Digital Signage Network Future-Ready 🕐
As your signage network expands, the way you structure your groups becomes even more important. Start broad, refine later — begin with simple categories, then adjust them as real-world needs emerge.
One of my favorite things about PiSignage is how easy it is to reassign players between groups. Your first setup isn’t permanent, so you can adapt quickly without redoing everything from scratch.
I also recommend creating “template” groups for common configurations. When you open a new location, you can roll out these pre-tested settings in minutes — a huge time saver for multi-location deployments.
Because PiSignage is hosted, your group configurations are accessible from anywhere. Whether you're troubleshooting from the office or pushing updates from the road, the browser-based interface keeps the whole network just a click away.
8. Upgrade to Effortless Screen Management 🚀
Our AV Integrator Kit — packed with step-by-step deployment guides and field-tested tips from real PiSignage installations.
With PiSignage Groups, you can schedule, update, and troubleshoot dozens of screens as easily as one — all from a single dashboard, wherever you are.
Want an easier way to run your digital signage network?
Start with 2 free PiSignage screens for life.
Originally published in 2020. Fully updated and expanded in August 2025 to reflect the latest PiSignage features.