
Creating ADVT Playlist


With piSignage you can insert advertising content in between your regular display. This is done with a feature called ADVT playlist.
These are Regular playlists with some modified settings. All the advertising assets that are to be displayed between regular display are put in this playlist. By using ADVT playlists along with your Regular playlist , you can create a display sprinkled with ads at fixed intervals. Here we explain how to create ADVT playlist .
Step by Step guide to Create an ADVT playlist
STEP 1
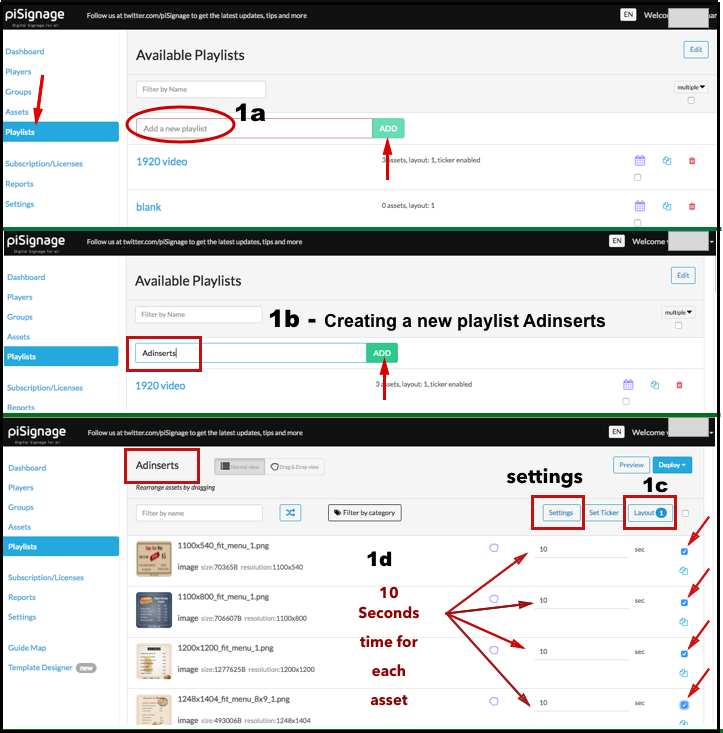
First A playlist is created in required layout with only the contents/assets which are to be displayed as part of Advertisement. Make sure you have set appropriate amount of display time for each asset.
To explain with an example (refer screenshots below) we have created a playlist called Adinserts (1a,1b) in Layout 1 (1c) and have selected the required advert assets for the playlist (1d), 4 Image assets in this case. Each asset of this playlist will be displayed for 10 seconds. While we have created a new playlist here, a pre existing playlist also can be converted into ADVT playlist following the next steps.
NOTE :
1) Though the above example has only image assets ,The ADVT playlist assets can be video or of any other type and also a combination of different asset types.
2) Make sure that appropriate assets required for your ADVT playlist are already uploaded to your piSignage account before actually creating the playlist.
For sake of simplicity, the ADVT playlist created in the above example is in layout 1 ie Single Zone display where a single asset will occupy the entire screen. We know piSignage has features to create multi zone displays with its LAYOUTS feature. As ADVT playlists are nothing but regular playlists with modified settings, ADVT playlists can also be created in Different Layouts and can be used in combination with regular playlists . We will explore such custom use cases in another writeup.
Once the playlist is ready, go to the SETTINGS section of the playlist (top right).
STEP 2:
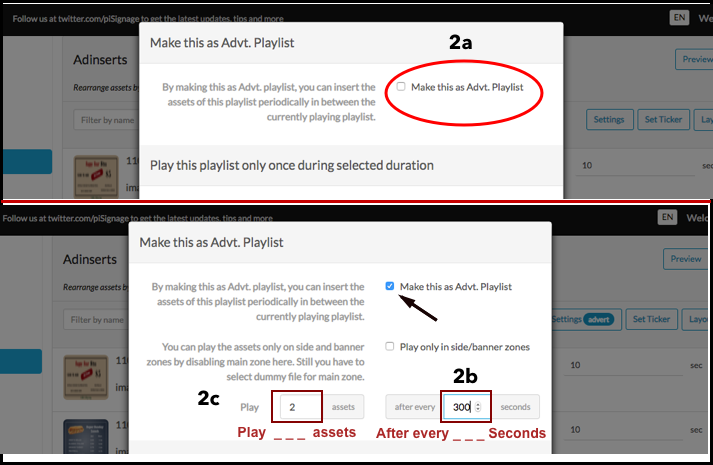
A popup window will open (refer screenshots below) where you have to check the box Make this as Advt Playlist(2a). Enter the time interval (2c) at which the Advert has to be displayed and also enter the number of assets to be played at every interval (2b).
In the example of playlist Adinserts, the interval is 300 seconds ie after every 5 minutes the Adinserts playlist will be displayed.
You can also control the number of assets played from the playlist. Your Advt playlist may have many assets but you may want only some to be displayed at every interval. ie if you have 10 assets in advt playlist but may want only 3 assets to be played per interval. So at every interval 3 successive assets are displayed cyclically and this will repeat for the entire period of display.
In the above example of Playlist Adinserts, the playlist has 4 image assets but we have set for only 2 assets to be played at every interval of 5 minutes.
STEP 3:
Leave all the next rows as it is. They are all used in specific use cases and we will discuss each in detail in a separate article . Scroll down and SAVE the settings (3a) and your ADVT playlist is READY (3b). Now you can add this ADVT playlist along with a regular playlist in a group, and display required advert contents between Regular display at specified time intervals.
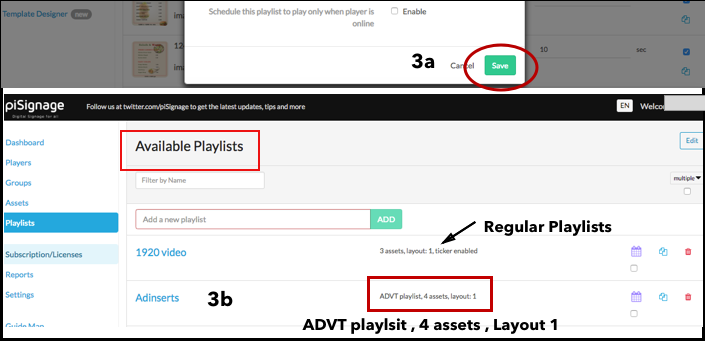
In the case of above example, if you use Adinserts playlist in combination with any regular playlist, The regular playlist will be interrupted every 5 minutes and 2 assets from Adinserts will be displayed for 10 seconds each, after which the regular playlist resumes. the cycle will repeat for the duration of the display.
While the popular use case of this feature is displaying Advertisements at intervals , Note that ADVT playlists can be used in all situations where the function is to insert any content (messages, reminders etc ) periodically between your default display.