
How to Connect PiSignage Player to Wi-Fi: Step-by-Step Configuration Tutorial
This guide walks IT teams and AV professionals through the built-in access point method — no keyboards, no Ethernet cables, just fast, browser-based configuration that streamlines field deployments and scales easily across locations. Includes security tips and alternate setup methods.

As someone who's spent countless hours troubleshooting digital signage deployments across enterprise environments, I know the frustration of that moment when a PiSignage player won't connect to Wi-Fi. You're standing in a retail location or office space, possibly without an Ethernet cable or keyboard, watching precious installation time tick away.
That's why I'm excited to share how PiSignage has transformed this process. The days of hunting for keyboards or running temporary Ethernet connections are behind us. Let me walk you through the streamlined Wi-Fi configuration method that's revolutionizing how we deploy digital signage.
Built-in Wireless Access Point
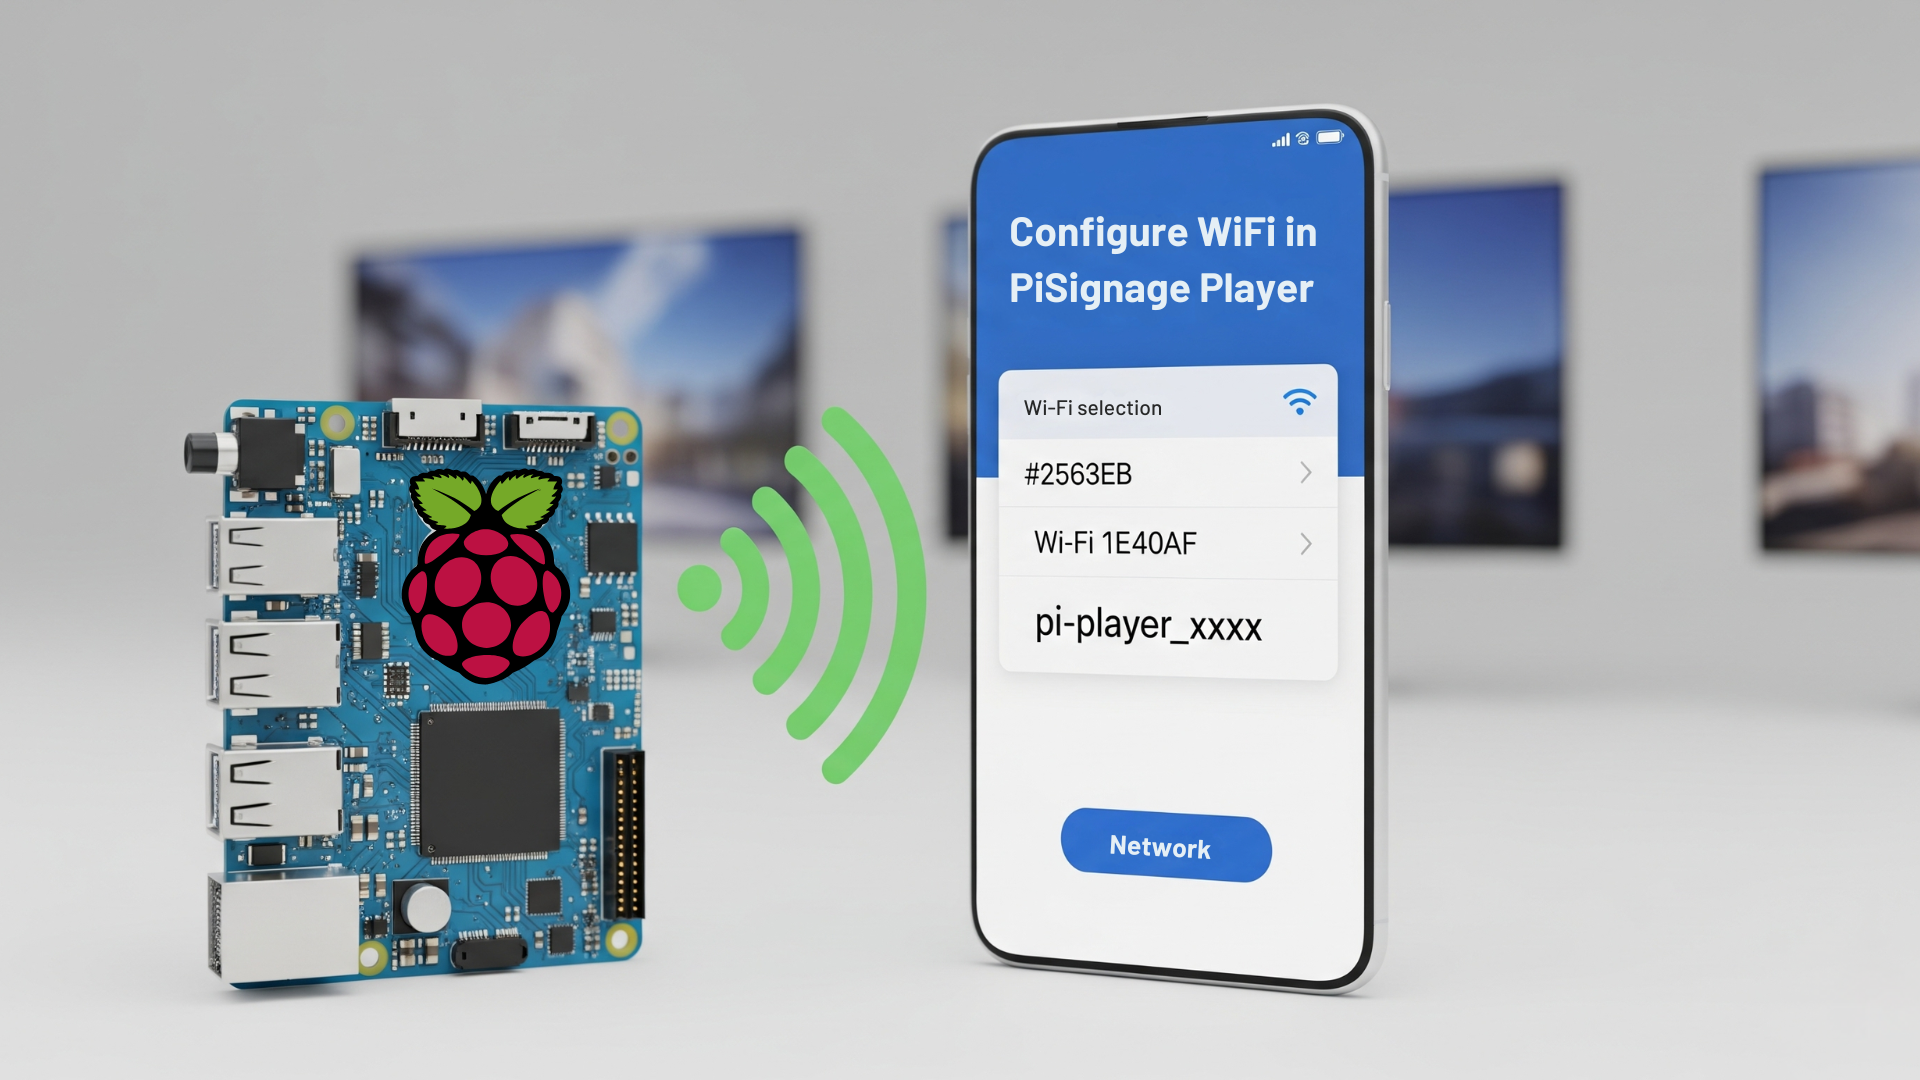
PiSignage Player can function as its own wireless access point. When powered on, PiSignage players now broadcast their own Wi-Fi network — typically named pi-player_xxxx (with unique identifiers).
Here's what makes this so powerful for field deployments:
- No hardware dependencies: You don't need to carry keyboards, mice, or worry about Ethernet availability. Your smartphone or laptop becomes your configuration tool.
- Universal compatibility: While this method works seamlessly with Raspberry Pi 3 and later models, PiSignage also supports a wide range of other hardware — including Chromeboxes, Android players, and Linux-based systems
- Secure by default: The access point uses the password "piplayer" and automatically disables after configuration, preventing unauthorized access.
This wireless access point method is the recommended approach for first-time Wi-Fi setup in our PiSignage installation guide. It’s especially useful for enterprise rollouts, multi-branch deployments, and remote site setups where speed and efficiency matter.
⏳Step-by-Step Configuration Process
The actual configuration process is refreshingly straightforward. Once your PiSignage player boots up, follow these steps:
- Connect to the player's network: Look for the Wi-Fi network named
pi-player_xxxxon your device and connect using the password "piplayer". - Access the configuration interface: Open your browser and navigate to
192.168.100.1:8000. This brings up the PiSignage player's local interface. - Login and configure: Use the credentials
pi/pito login, then navigate to the Wi-Fi configuration section. - Enter your network details: Input your target Wi-Fi network name (SSID) and password. Double-check these details carefully – accuracy is crucial since the access point mode will disable after saving.
- Save and reboot: Click save, and the player will automatically reboot and connect to your specified network.
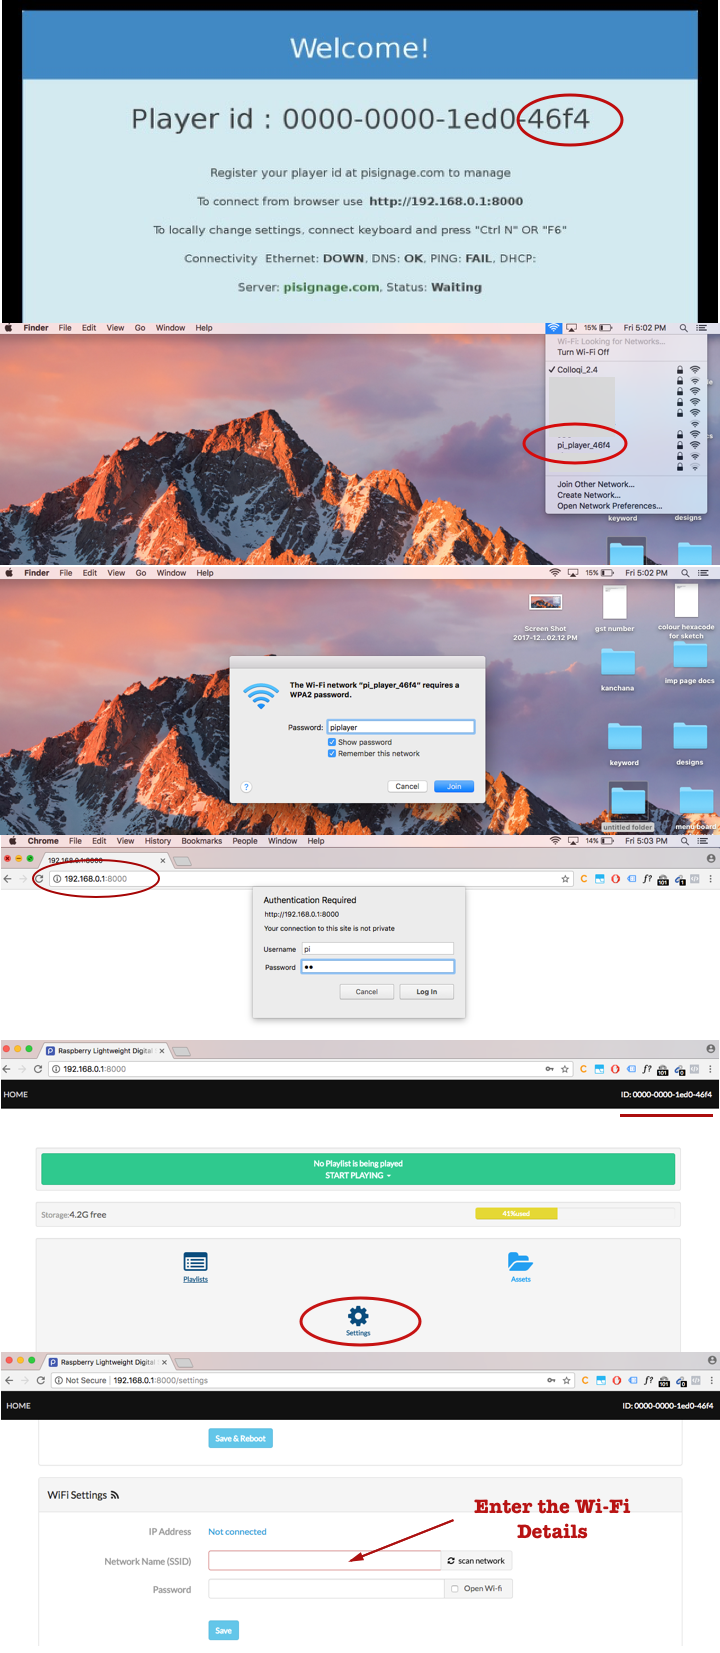
The entire process typically completes within 30 seconds of the reboot, with the player transitioning from disconnected to connected status seamlessly.
Watch it in action
See the entire Wi-Fi configuration process in this step-by-step video walkthrough from the PiSignage team:
YouTube Video for WiFi setup
Don't Let the Technical Language Fool You
The actual Wi-Fi setup process is surprisingly simple - no technical expertise required. If you can connect your phone to Wi-Fi and browse the internet, you can configure a PiSignage player.
The entire process is just like connecting to a hotel Wi-Fi: find the network, enter a password, and you're connected. The PiSignage team designed this feature specifically to eliminate technical barriers.
Quick Reality Check:
🎓Technical background needed: None
📱Special tools required: Just your smartphone or laptop
⏱️Time required: Under 5 minutes
📊Difficulty level: As easy as connecting to public Wi-Fi
Q: I'm not tech-savvy. Can I still set up PiSignage Wi-Fi myself?
A: Absolutely! The process is designed for anyone. You're essentially connecting to the PiSignage player like you would connect to any Wi-Fi network, then filling out a simple web form with your network name and password. No technical knowledge required.
Alternative Method: Keyboard Configuration
While the wireless access point method handles most scenarios, there are situations where the traditional keyboard method remains valuable. If you're working in an environment with Wi-Fi restrictions or prefer direct hardware interaction, you can still configure Wi-Fi using a USB keyboard.
The process is equally straightforward:
Connect a USB keyboard to your PiSignage player and wait for the welcome screen to appear. Press either Ctrl+N or F6 to open the network configuration screen. Use the arrow keys to navigate to "wifi configure," enter your network password, and save the configuration.
This method provides direct access to network settings without requiring any network connectivity, making it ideal for secure environments or situations where wireless access isn't feasible.
Enterprise Deployment Advantages
From an enterprise IT or AV integrator’s perspective, PiSignage’s flexible Wi-Fi configuration options translate into serious operational wins:
- Adaptability on the ground: Whether you're in a mall kiosk with no Ethernet or a clinic with locked-down networks, your team can switch between wireless access point and keyboard-based setup — no extra gear needed.
- Faster rollouts across locations: On many digital signage systems, configuring Wi-Fi at a new site can take 15–30 minutes — especially if the setup requires keyboards, temporary LAN access, or pre-approved MAC addresses. With PiSignage's wireless access point method, setup can be done in under 5 minutes, using just a phone or laptop — no IT support or extra hardware needed. Multiply that across dozens of locations, and you save hours or even days per deployment round.
- Minimal training overhead: The setup flow is browser-based and intuitive. No need to train field staff on SSH commands or network protocols — if they can connect to a Wi-Fi network, they can configure the player.
- Scale-ready by design: This streamlined setup pairs seamlessly with PiSignage’s enterprise features — like playlist scheduling, display grouping, and multi-screen sync — allowing your operations to grow without friction.
The PiSignage features documentation highlights how these deployment improvements complement the platform's enterprise-grade features like playlist scheduling and multi-display synchronization, creating a complete solution for large-scale digital signage operations.
🧠 Pro Deployment Tips for IT Teams
There's one crucial detail that every deployment team should understand: once you save Wi-Fi configuration, the wireless access point mode automatically disables. This security feature prevents ongoing unauthorized access to your players, but it means future Wi-Fi changes require returning to one of the original configuration methods.
- Future-proof your setup: After initial deployment (which needs no extra hardware), future Wi-Fi changes may require access via mobile device or keyboard — so it’s smart to keep one available as a fallback during network upgrades.
- Double-check before saving: Since you can’t re-access the access point after saving, it’s critical to enter the right credentials the first time. Test thoroughly before committing.
- Stagger deployment where possible: In multi-player rollouts, configure and test one device completely before cloning or repeating the process. It’ll save you time and prevent errors from scaling.
Also see: If you're deploying players in high-security or poor-signal environments, you may want to disable the internal Wi-Fi and Bluetooth radios on your PiSignage players and use external USB adapters instead.
👉 Learn how to disable internal Wi-Fi on PiSignage players
❓Quick Reference Q&A
Q: What's the default password for the pi-player_xxxx Wi-Fi network?
A: The password is "piplayer". This gives you access to connect your device to the PiSignage player's built-in wireless access point for configuration.
Q: Can I still change Wi-Fi settings after the initial setup is complete?
A: Yes, but you'll need to use the same configuration methods. The wireless access point mode only activates when the player can't connect to a configured network, so you'll need either a keyboard (Ctrl+N or F6) or access to the player's web interface if connected via Ethernet.
Q: What if my PiSignage player doesn’t show thepi-player_xxxxnetwork?
A: Ensure the player is freshly powered on and not already connected to a network. If the SSID still doesn’t appear, reboot the player and check again. For persistent issues, connect via Ethernet or use the USB keyboard method.
Q: Can I reset Wi-Fi settings if I entered the wrong password?
A: Yes. If the player fails to connect, it will automatically return to access point mode. You can then reconnect to thepi-player_xxxxnetwork and re-enter the correct credentials.
Q: Does the wireless access point method work on all PiSignage players?
A: It works on Raspberry Pi 3 and newer models. For older models, or if Wi-Fi hardware is missing, the keyboard method is required.
Q: Is the Wi-Fi configuration secure?
A: Yes. The built-in access point uses a default password (piplayer) and automatically disables after setup, preventing unauthorized access.
Ready to Streamline Your Digital Signage Deployments?
The enhanced Wi-Fi configuration capabilities in PiSignage Player represent a significant step forward for enterprise digital signage deployment. Whether you're managing a handful of screens or hundreds across multiple locations, these tools dramatically reduce installation complexity and deployment time.
Ready to Streamline Your Digital Signage Deployments?
PiSignage’s enhanced Wi-Fi configuration isn’t just a feature — it’s a productivity boost for your business. Whether you’re setting up 5 screens or 500, you can cut deployment time by 70% and eliminate the hassle of extra cables or tools.
For detailed technical documentation and deployment guides, visit our comprehensive documentation portal.
Originally published in 2019. Fully updated and expanded in August 2025 to reflect the latest PiSignage features.