Collaborators in PiSignage: Delegate Account Management with Confidence
Learn how PiSignage's collaborator feature enables secure account delegation for Businesses. Set granular permissions, manage multiple locations, and maintain control—with 2 screen licenses free for life and less than $3/month for additional screens. No IT expertise required.
TL;DR
- What It Is: A secure way to delegate digital signage management to team members with granular permissions - no need to share full admin access.
- Key Value: Designed for multi-location businesses (restaurants, retail, schools, offices, healthcare) - local managers can update displays instantly, avoiding IT bottlenecks.
- How It Works: Add collaborators (existing users or collaborator-only accounts), assign them to specific locations, groups, or tasks, and define access to playlists, players, assets, or payments.
- Security: Only admins can add/edit collaborators. All changes are logged for accountability. Simple onboarding - no technical skills required.
- Cost: 2 screens free for life. Each extra screen costs just $1.67/month. Adding collaborators is free, with no hidden fees.
- Step-by-Step: Account settings → Add collaborator → Assign groups/locations → Set permissions → Save.
- Business Benefits: Transparent pricing, streamlined operations, secure team collaboration, and scalable signage management across multiple locations.
- Get Started: Sign up for PiSignage, add your collaborators, and scale signage with confidence.
1. What are PiSignage Collaborators? 📖
PiSignage Collaborators is a feature that allows account owners to delegate specific management responsibilities to team members without sharing full administrative access. Collaborators can be granted granular permissions to manage digital signage content, playlists, and players across different locations or departments while maintaining security and organizational control.
There are two types of collaborators in PiSignage:
- Independent User Collaborators: Existing PiSignage users who maintain their own accounts and can be added as collaborators to other accounts
- Collaborator-Only Users: Accounts created exclusively for collaboration purposes without independent display network capabilities
Managing digital signage content across multiple locations and teams is becoming increasingly complex for businesses. Whether you're running a restaurant chain, managing corporate offices, or overseeing educational institutions, the challenge remains the same: how do you give your team members the right level of access without compromising security or creating operational bottlenecks?
PiSignage's collaborator feature solves this challenge by enabling secure, flexible account delegation—without the complexity or high costs typically associated with enterprise signage solutions.
2. The Business Pain Points in Account Management 🚫
Businesses face unique challenges when managing digital signage across teams:
Manual, centralized control creates bottlenecks.
When only one person can update content, busy teams and multiple branches suffer from delays. Local managers wait for IT approval for simple menu changes or promotional updates.
Security risks with blanket admin sharing.
Giving everyone full administrative access leads to unintended changes, accidental deletions, and security vulnerabilities. One wrong click can affect your entire display network.
Cost and complexity barriers in other signage software.
Many solutions require expensive enterprise packages or complex IT setups just to add team members. Simple delegation becomes an expensive headache.
3. Real-World Use Cases Across Verticals 🌐
PiSignage collaborators address delegation needs across various industries:
- Multi-location restaurants need managers to update daily specials and promotional screens without IT involvement
- Educational institutions want different departments controlling their specific displays while maintaining centralized oversight
- Corporate offices require delegation of reception and internal communications to non-IT staff
- Retail chains need granular, location-based content control for different store managers
- Healthcare facilities want department-specific screen management with administrative oversight
4. Video Tutorial: See Collaborators in Action 🎥
Want to see how easy it is to set up collaborators? Watch our step-by-step video tutorial:
Official PiSignage Collaborators Tutorial
For more tutorials and guides, visit our complete documentation.
5. Step-by-Step Guide: How to Delegate with PiSignage Collaborators 📋
Step 1: Access Your Main Account
Log into your primary PiSignage account—this serves as your master account where all players and assets are managed.
Step 2: Navigate to Collaborator Settings
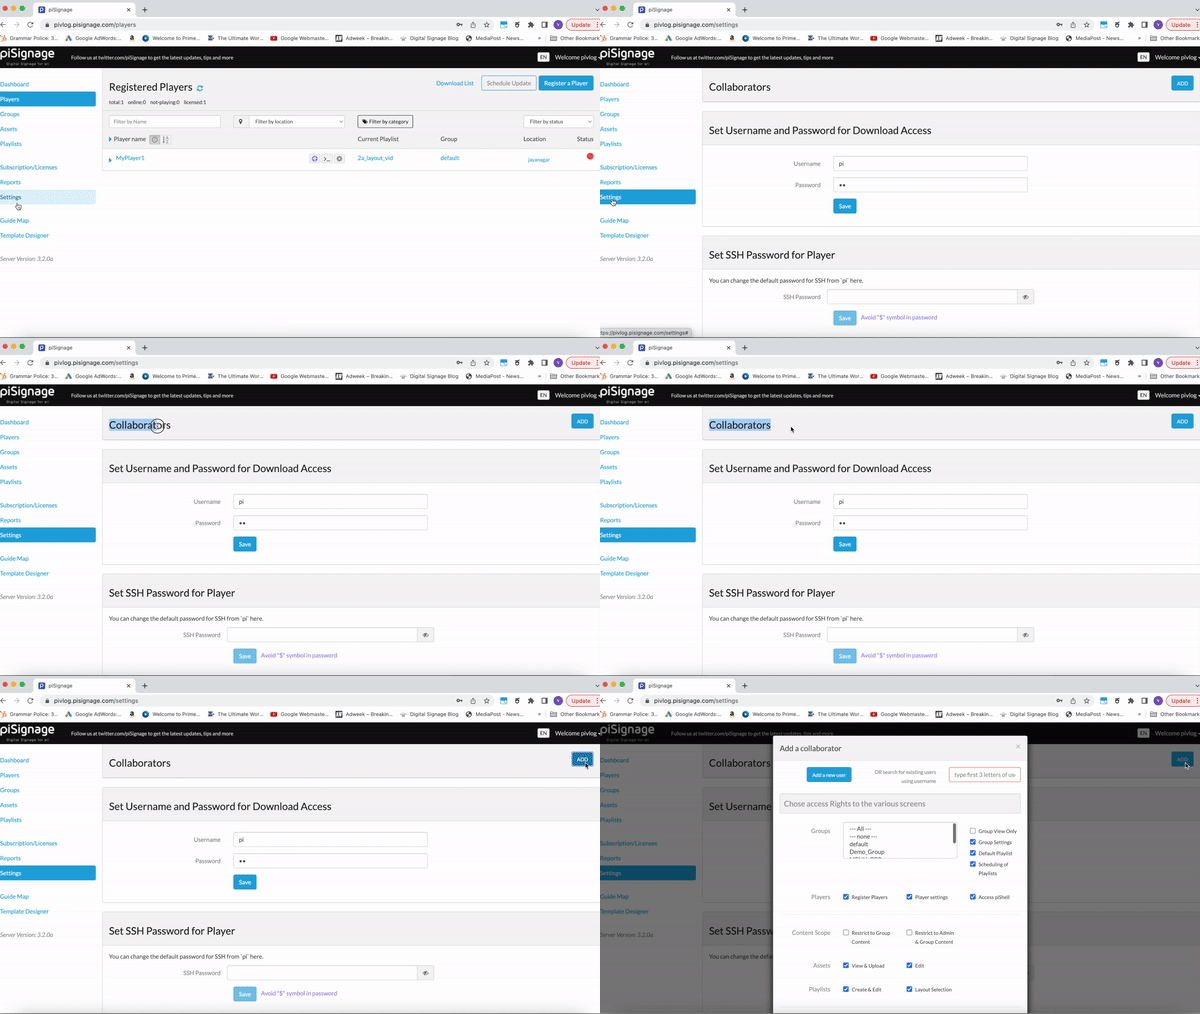
Go to the Settings section of your account. The first tab you'll see is Collaborators, where any previously added collaborators are listed.
Step 3: Add Collaborators (Two Methods)
Method 1: Add an Existing User
- Click Add to open the collaborator popup
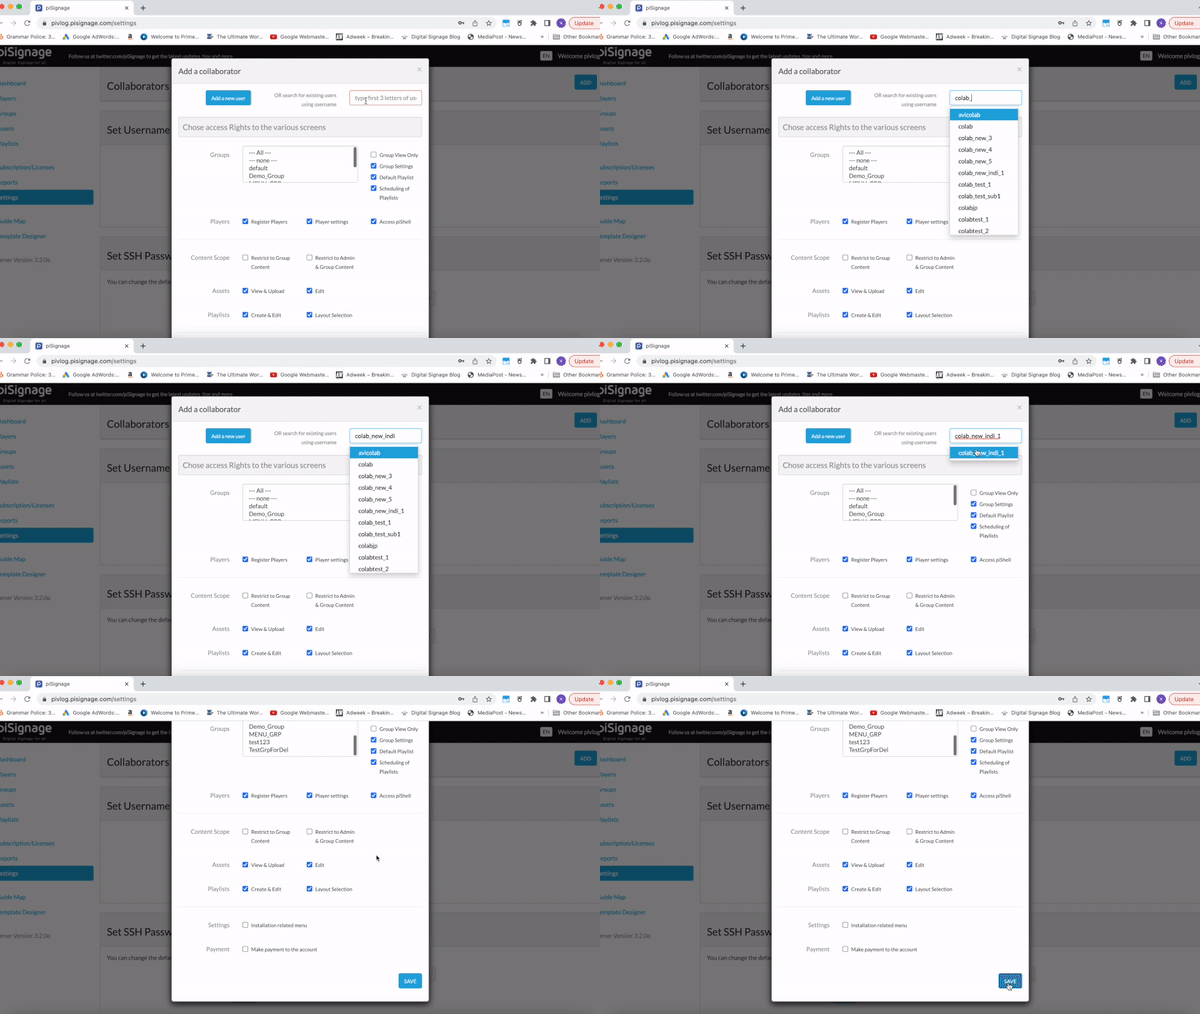
- Search for an existing PiSignage user by their username
- Select the user you want to add as a collaborator
Method 2: Create a New Collaborator-Only Account
- Click Add then select Add a new user
- Enter a unique user ID and password
- Email is optional for collaborator-only accounts
- Click Add collaborator then Save
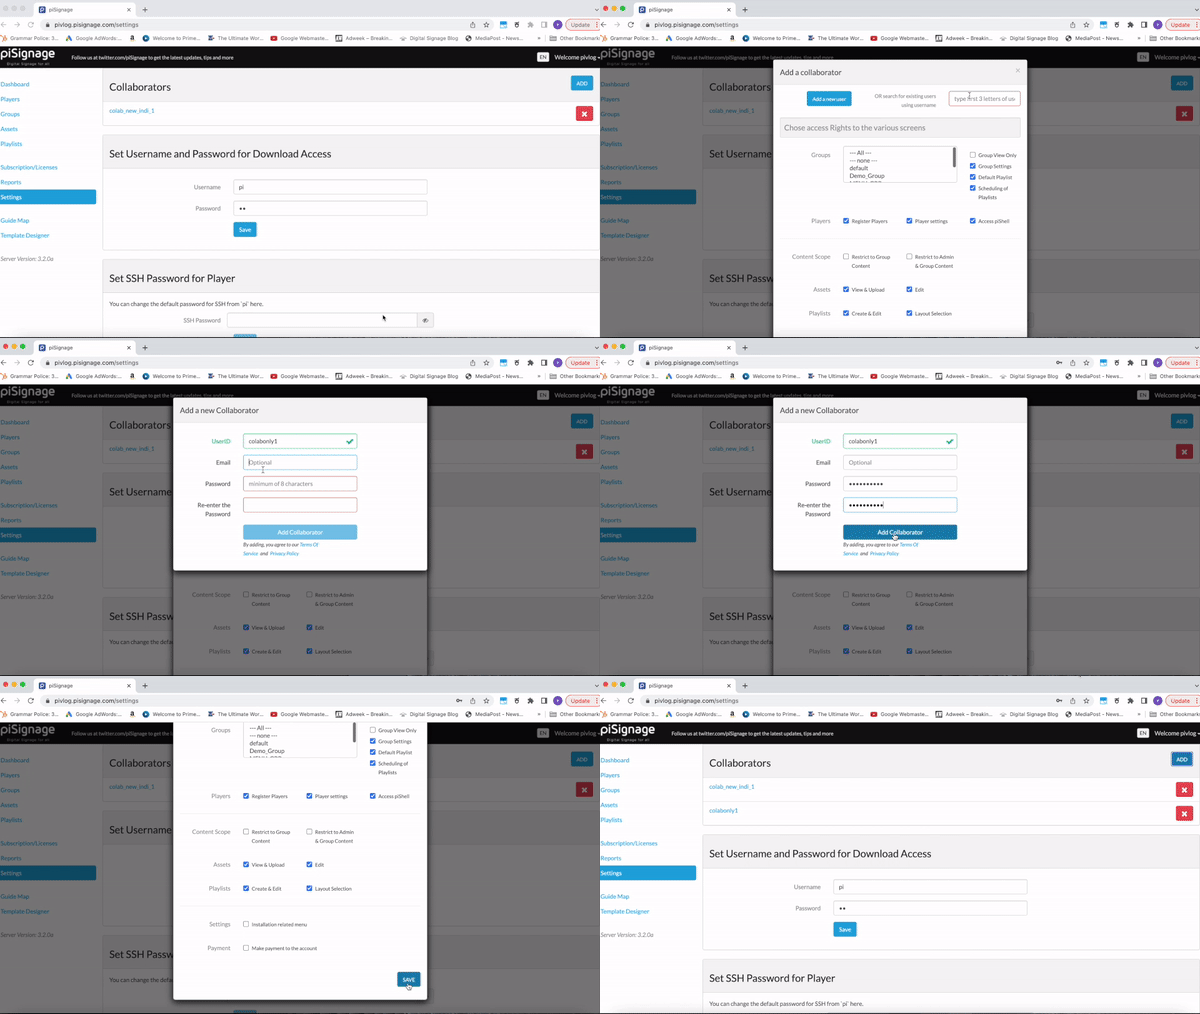
Note: Collaborator-only accounts cannot create independent display networks—they exist solely to manage accounts they're added to.
Step 4: Assign Group-Level Access
Select which groups the collaborator can access. Groups represent different sections of your display network (locations, departments, etc.). A collaborator can access one group, multiple groups, or all groups based on your needs.
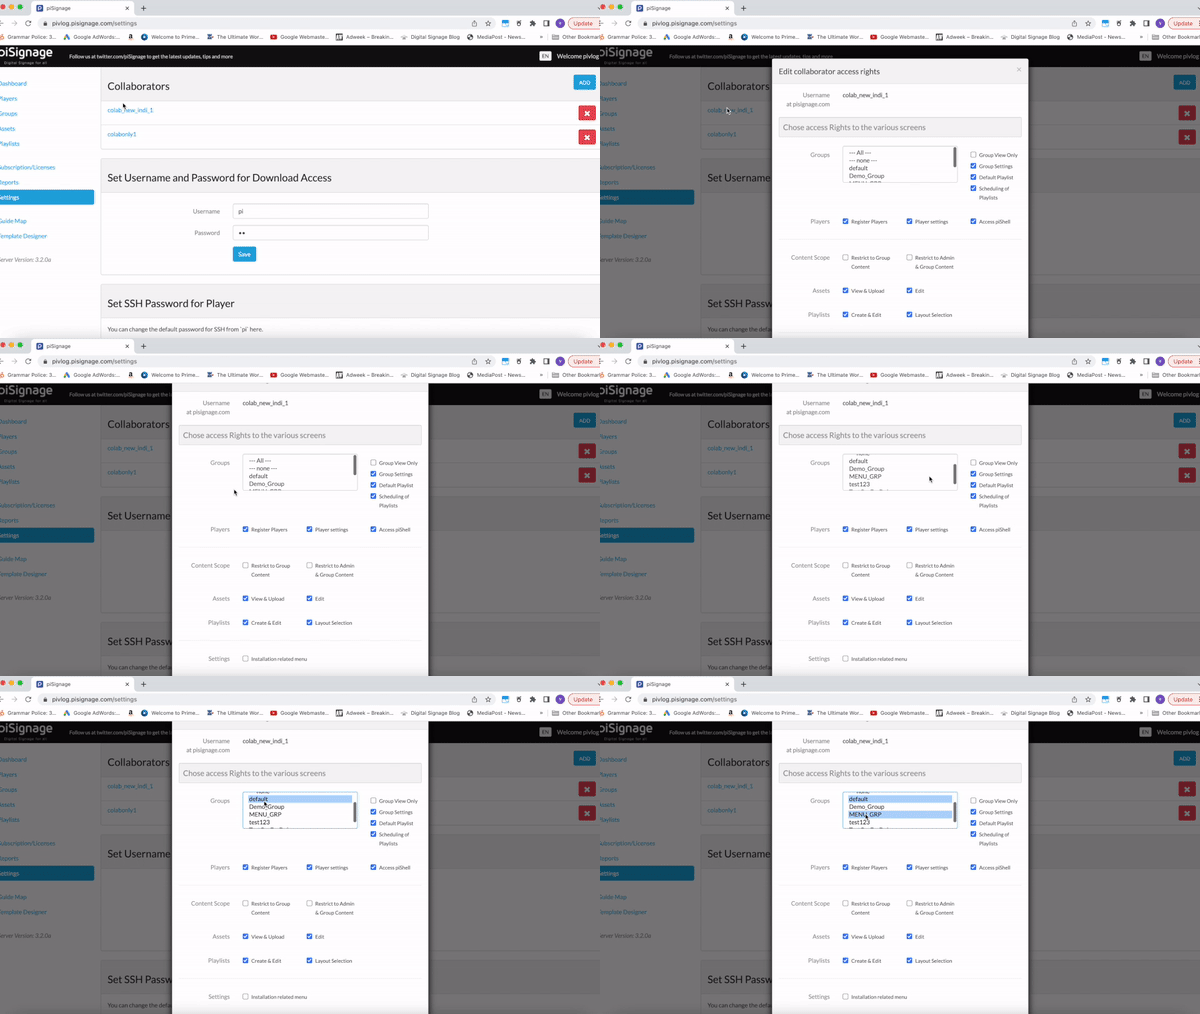
Step 5: Set Granular Privileges
Configure exactly what each collaborator can do:
Content Management:
- Deploy default playlists
- Schedule playlists
- Create and edit assets
- Create and edit playlists
- Access player controls
Administrative Functions:
- Payment management
- Account settings access
- User management (if needed)
Step 6: Configure Content Scope for Advanced Filtering
Content scope provides additional security layers:
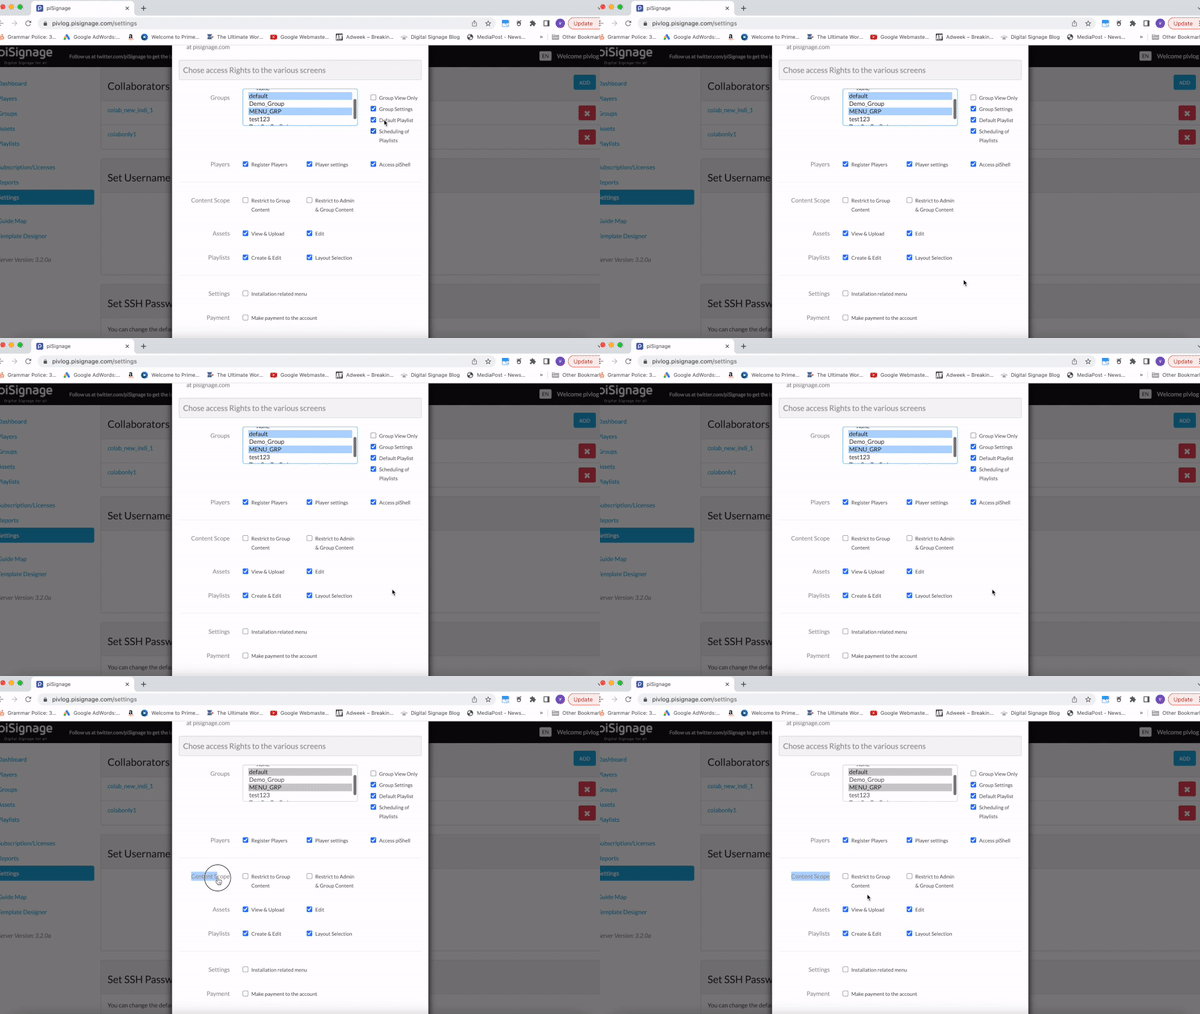
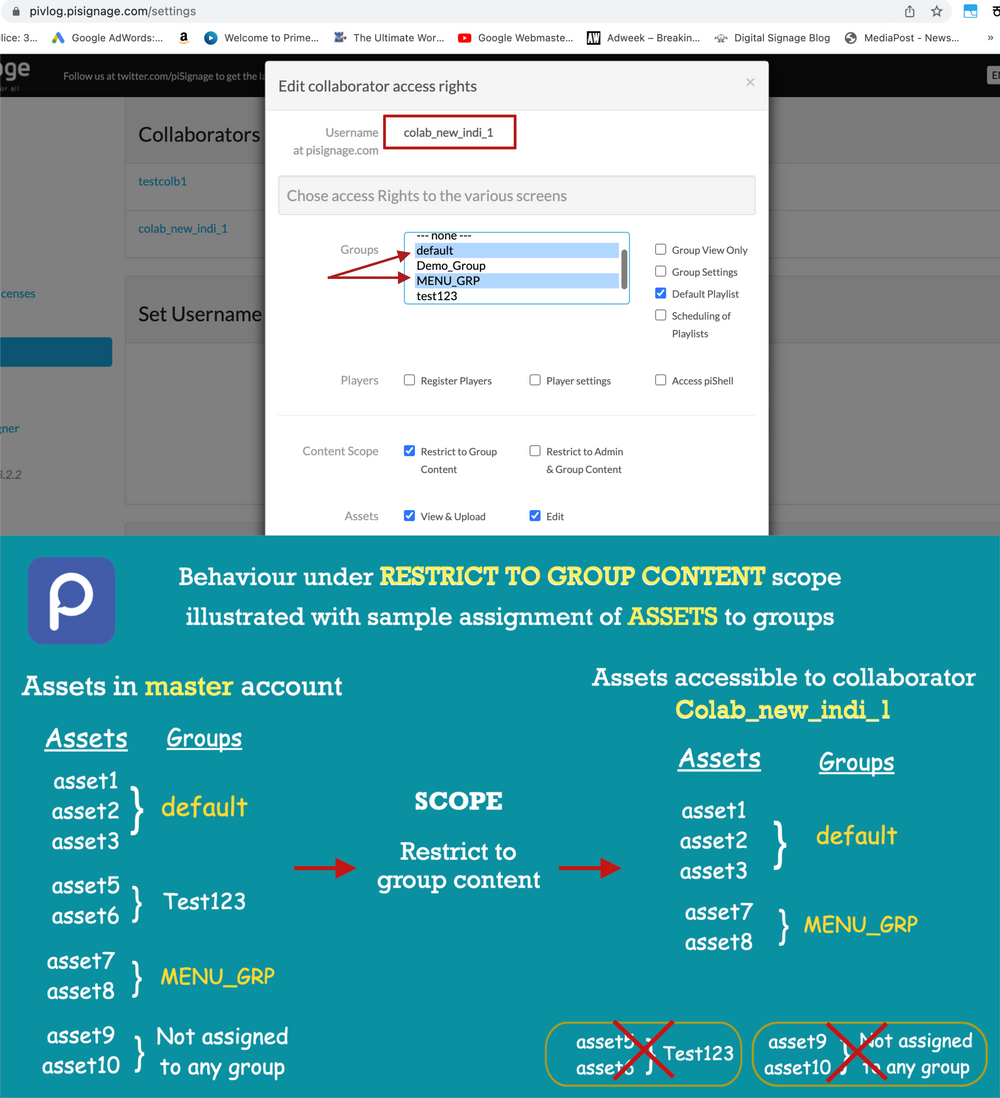
Restrict to Group Content: Collaborators see only players, playlists, and assets assigned to their accessible groups.
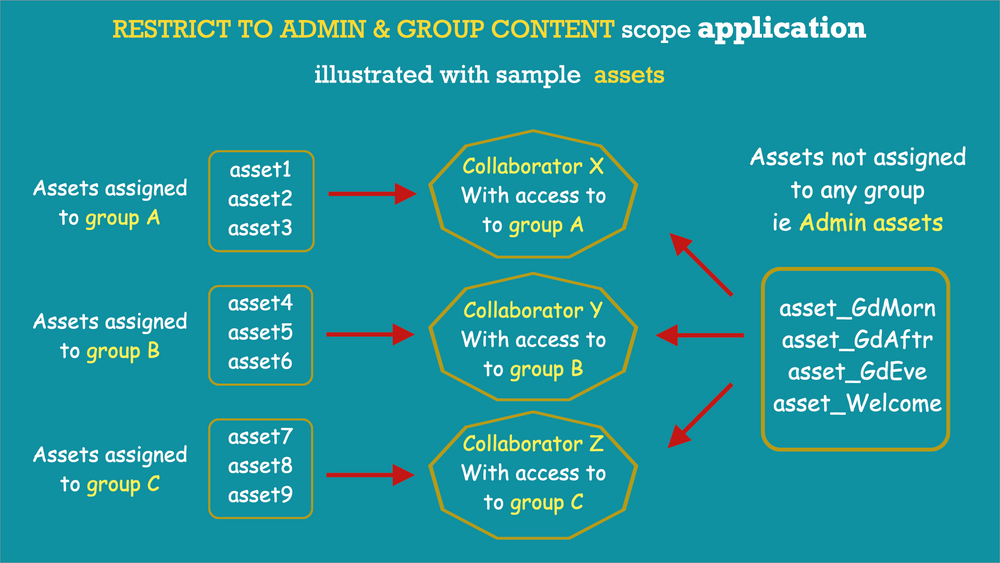
Restrict to Admin and Group Content: Collaborators access both their assigned group content plus admin assets (unassigned content available to all).
No Restrictions: Full access to all account properties.
Important: Content scope only applies when you've granted access to assets, playlists, or players. Without these permissions, content scope filtering is irrelevant.
Use the Emergency Playlist feature to instantly override all screens.
Step 7: Save and Verify Access
Click Save to complete the setup. Your collaborator can now log into their account and see your network in their account dropdown, with access limited to their assigned permissions.
Security Note: Only account owners and designated admins can add or modify collaborators, ensuring complete control over your team access.
6. What Makes PiSignage So Business Friendly ⚖️
| Feature | PiSignage |
|---|---|
| Pricing Transparency | 2 screen licenses free for life, additional screen licenses cost less than $3/month |
| User Onboarding | Simple, no IT team needed |
| Granular Team Permissions | Restrict by group, content scope |
| Security: Who Can Add Collaborators | Only owners/admins |
| User-Friendly Setup | Yes, designed for even non-techie teams |
7. Frequently Asked Questions ❓
Q: How do I add collaborators in PiSignage?
A: Navigate to Settings > Collaborators, then either add existing users or create new collaborator-only accounts. The process takes just minutes.
Q: What rights can I grant (and restrict) for each collaborator?
A: You have complete control over permissions—from simple playlist deployment to full administrative access. Use content scope to further limit visibility to specific groups or assets.
Q: Can collaborators make payments or only update content?
A: You decide. Payment and account settings are separate permissions you can grant or restrict based on your trust level and business needs.
Q: Is there a risk of unauthorized changes?
A: No. Only account owners can add collaborators, and you control exactly what each collaborator can access. All changes are logged and traceable.
Q: Do I need technical expertise or an IT team to onboard staff?
A: Not at all. PiSignage's collaborator system is designed even for non-techie users. Your team members can start managing content immediately after being added.
Q: What is the cost, and are there free licenses available?
A: PiSignage starts at $3/month with 2 screens free for life. Adding collaborators doesn't increase your costs—you only pay for the screens you use.
8. Start Delegating with Confidence Today 🚀
PiSignage's collaborator feature transforms how businesses manage their digital signage networks. With transparent pricing, intuitive controls, and enterprise-grade security, you can delegate responsibilities while maintaining complete oversight.
Ready to empower your team?
Sign up for PiSignage today and start with 2 free screens for life. Experience hassle-free account management that scales with your growing business.
Explore all PiSignage features or browse how-to articles for more practical solutions.
- Questions about collaborators or need help setting up your team?
Reach us at info@pisignage.com—we're here to help you succeed. - You can also visit PiSignage's help page for more queries.
Originally published in 2022. Fully updated and expanded in September 2025 to reflect the latest PiSignage features.

